
Free-to-play tacticians, here's how I cleared the Hrid maps. This is a really difficult map on Abyssal, unless you have Gale Force shenanigans at your disposal.
You'll probably want to equip all the required Skills and Seals before you begin. Remember to write down which Seals and C Slot skills you want to try out on your Dancers, as you may need to adjust them. The skills in red text below are flexible depending on your own units.
I should mention that since I'm F2P, most of my resources have gone into cavalry, namely The Reinhardt and City Mongolian Bow Lyn. I highly recommend that you do the same. On the other hand, I also spent 820 F2P orbs to +10 Sigurd on his focus banner recently, and ironically he wasn't much help on these two maps. Even with maxed out Summoner Support. Nope, you need to use The Reinhardt + Bow Lyn + Two Dancers like you always do.
*** Obligatory Possible Spoiler Warning ***
This solution uses the tried and true, always reliable The Reinhardt + Bow Lyn + Two Dancers formula.
Although the Summoner in this video strategy seems to be using double Attack Tactics plus two other Tactics Seals, I was too poor to do this. So instead, I just slapped a Spur Attack and Drive Attack on my Dancers.
Reinhardt (+ATK -DEF)
Skills: Blazing Thunder; Hone/Goad Cavalry; Standard Death Blow 3 + Lancebreaker
Seals: Quickened Pulse
S Support: Bow Lyn
S Support: Bow Lyn

Bow Lyn (+SPD -RES)
Skills: Desperation 3; Hone Cavalry; Standard Brave Bow
Seals: Brash Assault 3
S Support: Reinhardt
S Support: Reinhardt

Small Azura (Neutral)
Skills: Torrent Dance 3; Spur Def/Res 2
Seals: Drive Attack 2

Flying Azura (+ATK -HP)
Skills: Triangle Adept 3; Wings Of Mercy; Spur Attack 3
Seals: Res Tactic 1

***
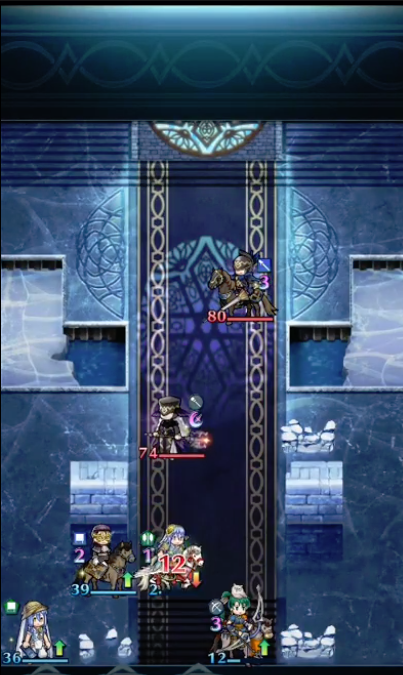
The Abyssal Map begins with our units positioned like this:

And it should all go smoothly, until Bow Lyn tries to hit this Blue Manakete. The Summoner in the video has his Bow Lyn at 12 HP after this fight. But, my Bow Lyn is -RES, and only barely survived with a measly 7 HP. This will become a problem later.

Later, when our Bow Lyn attempts to assassinate this Blue Manakete, she may not have enough HP or defenses to live the second engagement. The Blue Manakete needs to die this turn or earlier, so it would help if you were able to chip off more of her HP in the first engagement. This is where you really need the correct Seals or C Slot skills to save your Bow Lyn.

Now that most of the dangerous enemies are dead, a new problem arises. Our Bow Lyn only has 7 HP, and is vulnerable to dying if struck by the enemy Healer. Since the previously mentioned annoying Blue Manakete is now deceased, The Reinhardt is perfectly capable of murdering both the Bow Cavalier and the Axe Flier himself. This allows our weakened Bow Lyn (and Flying Azura) to hide in the corner of the map, out of the enemy Healer's strike range.
We're nearly home free now. Murder the enemy Healer, while keeping your units out of the Lance Cavalier's stabbing range. Then bunch everyone up to gain all the buffs, and gang up on the Lance Cavalier before he can hit anyone. Congratulations, you've won a gold colored hair pin thing! Totally worth the hours of internal screaming, yeah?
If your Reinhardt and Bow Lyn aren't merged, there's also this similar guide:
***
If your Reinhardt and Bow Lyn aren't merged, there's also this similar guide:
Note: PM1 has solutions for this Map too, but the Abyssal map uses a Pain+ Lucius. I tried substituting in my Pain+ Priscilla, but that didn't work out as planned. So, back to old reliable The Reinhardt I went.
***
Infernal Map
***
Infernal Map
This F2P solution worked perfectly for me, and used minimal resources.
Alternatively, you could also use a Brave Bow + 3 Dancers combo, or repeat the Abyssal strategy above.
No comments:
Post a Comment